Epic of Serinor Manual
Controls and Menus
Introduction
Controls/Menus
Statistics
Races
Classes
Abilities
Downloads
Developer's Log
Team and Thanks
Basic Controls
Arrow Keys - Move Party/Cursor
Enter - Activate/Confirm
Alt - Cancel
Space - Open Menu
Escape - Return to Title
Alt+X - Close Game
Alt+Enter - Toggle Windowed/Fullscreen
Main Menu
Item - View inventory for a character. Items can be used, equipped, traded to another character, or dropped through this menu. Pressing left or right while viewing a character's inventory will switch characters.
Ability - View abilities for a character. If the character can cast spells, his readied spells may be changed through this menu. An ability slot marked with a "-----" denotes an ability that has not yet been learned. Pressing left or right while viewing a character's abilities will switch characters.
Status - View the statistics, factions, resistances, and equippable items for a character. Pressing left or right while viewing a character's status will move to the next page of stats, and up or down will switch characters.
Party - View party factions, party statistics, the party spellbook of all known spells, the party's completion status on major quests, and the world map. Pressing left or right will move to the next page of stats.
Order - Change the order of characters in the party. This menu also displays the hate values the characters will have at the start of combat. These values are based on class, level, and proximity to the front of the party.
Config - Change menu color, menu transparency, number highlighting, and various battle options.
Item Menu
When an item is selected from the inventory menu, the Item Detail box will appear. The first line lists the name of the item. If the item is usable, the number of uses and target of the item will be listed here. If the item is equipment, the type of equipment and where it is equipped will be shown. The value line lists how much the item can be bought for in a shop. An item will normally sell for 2/3 of its value. If the item is a piece of equipment, the rest of the box will detail how it will affect a character's attack, defense, magic, and resistances.
All characters have 5 equipment slots: right hand, left hand, body, head, and ring. If an item lists the slot it is equipped to as "Both Hands," it will require both right and left hand slots to equip. However, a bracer can still be worn on the left hand if using a two-handed weapon.
Use - Uses the selected item. The item's effect is listed at the bottom of the screen.
Equip - Equips the selected item. An item can only be equipped if the current character's class is able to equip items of the selected item's equipment class. A list of these items can be seen in the character's status menu.
Trade - Gives the selected item to another character. Characters can only hold up to 8 items in their backpack, not counting any equipped items.
Drop - Discard the selected item. A confirmation box will be displayed before the items is dropped.
Hostel Menu
Add - Move a character from the hostel to the party.
Remove - Move a character from the party to the hostel.
Swap - Switch a character in the party with a character in the hostel
Create - Create a new character. The active party must have an average faction of 7 with the local population for this option to appear. New characters will receive starting experience when moved into the party.
Delete - Delete a character in the hostel. Delete will automatically try to transfer the character's items to the party, and if the party cannot hold all of them, the character cannot be deleted.
View - View status and inventory of a character in the hostel.
Vault Menu
Gold - Deposit and withdraw gold. Pressing left and right will move the cursor between digits, up will move gold to the vault, and down will move gold to the party. If there is more gold stored in the vault than there is Gold Accessible, additional gold will not be able to be deposited.
Deposit - Move items to the vault. Up to 100 items can be stored in the vault, though it may not be possible to use all of them. Only a number of items up to the number of Slots Accessible may be deposited, and if more than this are already in the vault, no items can be deposited
Withdraw - Remove items from the vault. Only items in slots up to the number of Slots Accessible can be withdrawn.
Leave - Close the vault menu.
Character Creation and Level Up
Name - Use the keyboard to type in a name for the character. Only appears during creation.
Class - Use left and right to scroll through the classes available to recruit in the current city. Only appears during creation.
Gender - Use left and right to toggle the character's gender. Not available for all races. Only appears during creation.
Statistics - Use left and right to add or subtract any remaining stat points to the character's six attributes. The current race's maximum attribute values are listed in gray. A description of the effects of the selected attribute appears at the bottom of the screen.
Spells Used - If the selected class can use spells, the schools available will appear here. Only appears during creation.
Maximum Spell Level - If the character begins able to use spells, this will appear. During level up, the message "Maximum spell level rises!" will appear here if the character has gained access to new spells.
Initial Ability - If the character begins with a class ability, this will show the ability's name. During level up, the message "Learned" and an ability name will appear here if the character has gained access to a new ability.
Battle Menu
Fight - Individually assign actions to each character.
Wait - Instructs the entire party to defend. Defending halves the damage a character takes for one round. Waiting does not cancel Guard-type effects as a normal defend action would. Wait cannot be cancelled once selected.
Flee - Instructs the party to try to escape battle. Success rates are based on the party's average agility against the enemies' average agility. Flee cannot be cancelled once selected.
Let Go - If the enemies are so much weaker than the party that they will not give an experience award, Flee becomes Let Go. Let Go will end combat immediately.
Equip - Change a character's equipment. Does not begin the combat round.
Battle Effects
All lasting effects on the party in combat are indicated by an icon. Each of these icons uses a similar scheme to indicate the type of the effect, whether it is positive or negative, and the related element where applicable. At the center of each icon is a graphical depiction of the type of effect (see first list below.) This picture appears on a field of a solid color which is either red for negative effects or green for positive effects. If the effect has a related element, the red/green field is surrounded by a thin band of color that indicates the element (see second list below.) Each icon has a black border to distinguish it from other effects.
Combat Effect Icons
|
Resistance Colors
|
Fishing Game
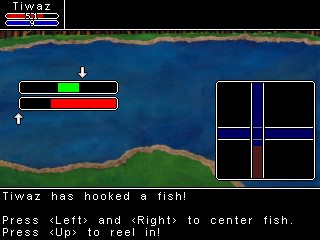
Fishing is a mini-game that can be played wherever the party can find a fisherman willing to share his spot. To fish at all, a character must have a fishing pole equipped. While it is possible to fish without a lure, it is impossible to actually catch fish without one, so it is strongly recommended that the fishing character have a lure of some sort equipped as well. All characters can equip fishing poles and lures, and they are available for purchase at items shops across the world.
Once Cast is selected from the actions menu, press Enter to stop the arrow and cast the line with the given force. Pressing Up will reel in the line after the cast. If a fish is caught, pressing Up will reel in the line. However, the lower bar on the left of the screen shows the line tension, and the arrow will move closer to the red the longer Up is pressed. If the arrow ever goes into the red, the line will break, and both the fish and lure will be lost. Pressing Left and Right will center the arrow in the green box at the center of the top bar on the left. The size of the green box is related to the strength of the hooked fish, and keeping the arrow centered will allow the fish to be reeled in faster. When the location indicator on the right side of the screen moves all the way to the left of its box, the fish will be caught. If, however, it moves all the way to the right of its box, the fish will have gotten away. The lure will not be lost in this case.
Cast - Cast the line. A fishing rod must be equipped to cast.
Equip - Change the selected character's equipment. In theory this would be to equip a rod or lures.
Change - Change the character who is fishing.
Quit - Leave the fishing game.
All contents copyright 2003-2007 Benjamin Eldritch